Cetmix Tower Server Management

Beta License: AGPL-3 cetmix/cetmix-tower

Cetmix Tower offers a streamlined solution for managing remote servers via SSH or API calls directly from Odoo. It is designed for versatility across different operating systems and software environments, providing a practical option for those looking to manage servers without getting tied down by vendor or technology constraints.

Why Cetmix Tower?

Server Management

Connectivity

Commands

Flight Plans

Files

Support and Technical Requirements

Table of contents

Configuration

Please ensure that you have read and understood the documentation before running Cetmix Tower in the production environment.

User access configuration

In order for a user to be able to use Cetmix Tower features you need to provide access to in the the user settings. To configure it go to Setting/Users & Companies/Users and open a user whom you would like to provide access to the Cetmix Tower.

User profile

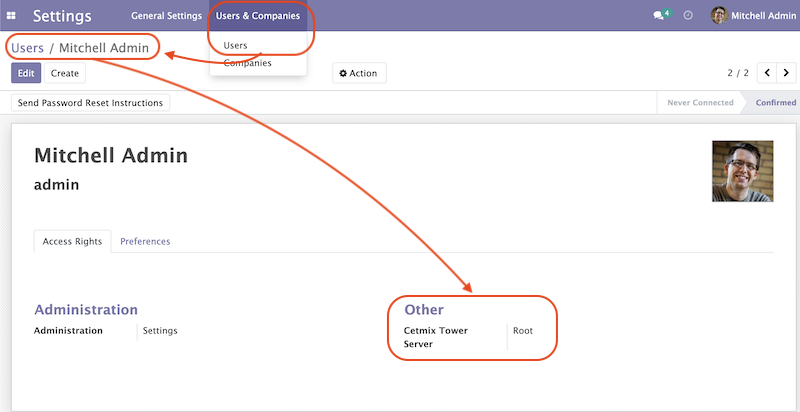
In Other section find the Cetmix Tower field and select one of the following options:

  • User. Members of this group have read access only to the Servers which they are added as followers. They also have access to the entities such as Commands, Flight Plans or Server Logs with Access Level set to User.
  • Manager. Members of this group can modify Servers which they are added as followers. They can create new Servers too however they cannot delete them. Users of this group have access to the entities with Access Level set to Manager or User.
  • Root. Members of this group can create, modify or delete any Server. They also have access to the entities with any Access Level set.

NB: Please keep in mind that some of the entities can have their additional access management variations.

Configure a Server

Go to the Cetmix Tower/Servers/Servers menu and click Create. Enter server name and a unique server reference. Leave the “reference” field blank to generate a reference automatically. You can also select a color which is used to mark a server in the kanban view.

Fill the values it the tabs below:

General Settings

  • Partner: Partner this server belongs to
  • Operating System: Operating system that runs on the server
  • Tags: User-defined search tags
  • IPv4 Address
  • IPv6 Address: Will be used if no IPv4 address is specified
  • SSH Auth Mode: Available options are “Password” and “Key”
  • SSH Port
  • SSH Username
  • Use sudo: If sudo is required by default for running all commands on this server
  • SSH Password: Used if Auth Mode is set to “Password” and for running sudo commands with password
  • SSH Private Key: Used for authentication is SSH Auth Mode is set to “Key”
  • Note: Comments or user notes

There is a special Status field which indicates current Server status. It is meant to be updated automatically using external API with further customizations. Following pre-defined statuses are available:

  • Undefined
  • Stopped
  • Starting
  • Running
  • Stopping
  • Restarting

Default status is ‘Undefined’.

Configuration

Configure configuration variables values to be used when rendering commands and files on this server.

Secrets

Configure secret values to used when rendering commands and files on this server. Check the Configuring Keys/Secrets section for more details.
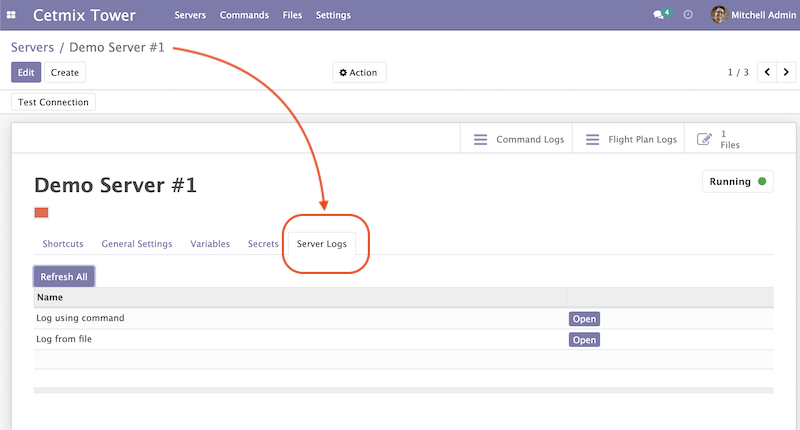
Server Logs

Configure server logs in order to have convenient access to them. Logs can be fetched either from Files or using Commands. Check the Configuring a Server Log section for more details.

Following action buttons are located in the top of the form:

  • Command Logs: Shows all Command logs for this server
  • Flight Plan Logs: Shows all Flight Plan logs for this server
  • Files: Shows all Files that belong to this server

Configure a Server Template

Go to the Cetmix Tower/Servers/Templates menu and click Create. Enter template name and a unique template reference. Leave the “reference” field blank to generate a reference automatically.

Fill the values it the tabs below:

General Settings

  • Flight Plan: Select a flight plan to be executed after a server is created
  • Operating System: Default operating system for new servers
  • Tags: Default search tags for new servers
  • SSH Auth Mode: Default SSH auth mode for new servers. Available options are “Password” and “Key”
  • SSH Port: Default SSH port for new servers
  • SSH Username: Default SSH username for new servers
  • Use sudo: Default sudo mode for new servers
  • SSH Password: Default SSH password for new servers
  • SSH Private Key: Default SSH private key for new servers
  • Note: Comments or user notes

Variables

Configure default variable values for new servers. Check the Configuring Variables section for more details.

Server Logs

Please check the Configuring a Server Log section for more details.

Configure Variables

To configure variables go to the Cetmix Tower/Settings and select the Variables menu. Click Create and put values in the fields:

  • Name: Readable name
  • Reference: Unique identifier used to address variable in conditions and expressions. Leave blank to generate automatically based on name
  • Note: Put your notes here

Variables Applicability

Cetmix Tower supports jinja2 syntax for variables. You can use variables to render:

  • Commands. Eg ls -lh {{ file_store_location }}
  • Files. Eg a “Dockerfile” file can have the following text in it: ODOO_VERSION = {{ odoo_default_version }}
  • File Templates. You can use variables for both file name and file location on server. Eg File Name value is backup_{{ instance_name }}_{{ odoo_db_name }} and Directory on server is {{ file_cron_location }}
  • Other Variables. Eg for an odoo_config_location variable can have a value of {{ odoo_root}}/conf

You can use any jinja2 supported expressions. For example if else statements:

docker run -d -p {{ odoo_port }}:8069 \
{% if  odoo_longpolling_port and odoo_longpolling_port != '0' and odoo_workers and odoo_workers != '0' %}
    -p {{ odoo_longpolling_port }}:8072 \
{% endif %}
    -v {{ odoo_data }}:/var/lib/odoo \
{% if  odoo_config_location %}
    -v {{ odoo_config_location }}:/etc/odoo \
{% endif %}

Variable Rendering Modes

There are two rendering modes available:

  • Generic (or ssh) mode
  • Pythonic mode

Let use the following code as example:

current_branch={{ branch }}
current_version={{ package_version }}
need_update={{ update_available }}

where branch is main, package_version is 0.12 and update_available is False

Generic Mode

Default mode which renders variable values “as is”. It is done in order to keep compatibility with any code interpreter which may be used to run a command. The code from example will be rendered the following way:

current_branch=main
current_version=0.12
need_update=False

Pythonic Mode

This mode is used in commands that run Python code (Action: Execute Python code). In this mode all variable values except Boolean and None are enclosed in double quotes. The code from example will be rendered the following way:

current_branch="main"
current_version="0.12"
need_update=False

Variable Types

Following types of variable values available in Cetmix Tower:

  • Local values. Those are values that are defined at a record level. For example for a server or an action.
  • Global values. Those are values that are defined at the Cetmix Tower level.

When rendering an expression local values are used first. If no local value is found then global value will be used. For example default value of the odoo_port variable is 8069. However you can easily specify any other value and thus run multiple Odoo instances on a single server.

IMPORTANT!: Storing sensitive data (eg GitHub tokens) in variable values may expose that date in command preview and logs. Use secrets for storing such data instead.

‘tower’ System Variable

There is a special tower variable available which allows to access some system parameters and helper tools. Important! do not redefine the tower variable unless you really need that on purpose.

Following system variables are available:

  • Server properties
    • tower.server.name Current server name
    • tower.server.reference Current server reference
    • tower.server.username Current server SSH Username​
    • tower.server.ipv4 Current server IPv4 Address​
    • tower.server.ipv6 Current server IPv6 Address​
    • tower.server.partner_name Current server partner name
  • Helper tools
    • tower.tools.uuid Generates a random UUID4
    • tower.tools.today Current date
    • tower.tools.now Current date time

Configure a Key/Secret

Keys/Secrets are used to private SSH keys and sensitive data that is used for rendering commands. To configure a new key or secret go to Cetmix Tower/Settings/Keys click Create and put values in the fields:

  • Name: Readable name
  • Key Type: Following values are available:
    • SSH Key is used to store SSH private keys. They are selectable in Server settings
    • Secret used to store sensitive information that can be used inline in commands. Eg a token or a password. Secrets cannot be previewed in command preview and are replaced with placeholder in command logs.
  • Reference: Key/secret record reference
  • Reference Code: Complete reference code for inline usage
  • Value: Key value. IMPORTANT: This is a write only field. Please ensure that you have saved your key/secret before saving it. Once saved it cannot be read from the user interface any longer.
  • Used For: SSH Key type only. List of Servers where this SSH key is used
  • Partner: Secret type only. If selected this secret is used only for the Servers of selected partner
  • Server: Secret type only. If selected this secret is used only for selected Server
  • Note: Put your notes here

Keys of type Secret

Keys of type Secret (or “Secret”) are considered “Global” if no partner and no server are selected. Such keys are accessible all across the Tower. Global keys are overridden with partner keys with the same reference. Partner keys in their turn are overridden with server specific keys. Priority order from highest to lowest is:

  1. Server specific
  2. Partner specific
  3. Global

Secrets are inserted inline in code using the following pattern: #!cxtower.secret.REFERENCE!#. It consists of three dot separated parts and is terminated with a mandatory !# suffix:

  • #!cxtower is used to declare a special Tower construction
  • secret is used to declare its type (secret)
  • REFERENCE secret id as it’s written in the Key ID field

Example:

Suppose we have a secret with Key ID set to MY_SECRET_DIR and value suchMuchFolder. In this case the following command:

mkdir /home/#!cxtower.secret.MY_SECRET_DIR!#

will be executed as:

mkdir /home/suchMuchFolder

Configure a File

Cetmix Tower is using SFTP protocol for file transfer operations. Based on initial file location following file sources are available:

  • Server. These are files that are initially located on remote server and are fetched to Cetmix Tower. For example log files.
  • Tower. These are files that are initially formed in Cetmix Tower and are uploaded to remote server. For example configuration files. Such files are rendered using variables and can be created and managed using file templates.

To create a new file go to Cetmix Tower/Files/Files click Create and put values in the fields:

  • Name: Filesystem filename
  • Source: File source. Available options are Server and Tower. Check above for more details.
  • File type: Type of file contents. Possible options:
    • Text: Regular text. Eg configuration file or log
    • Binary: Binary file. Eg file archive or pdf document
  • File: Is used to store binary file data.
  • Template: File template used to render this file. If selected file will be automatically updated every time template is modified.
  • Server: Server where this file is located
  • Directory on Server: This is where the file is located on the remote server
  • Full Server Path: Full path to file on the remote server including filename
  • Auto Sync: If enabled the file will be automatically uploaded to the remote server on after it is modified in Cetmix Tower. Used only with Tower source.
  • Keep when deleted: If enabled, file will be kept on remote server after removing it in the Odoo

Following fields are located in the tabs below:

  • Code: Raw file content. This field is editable for the Tower files and readonly for Server ones. This field supports Variables.
  • Preview: This is a rendered file content as it will be uploaded to server. Used only with Tower source.
  • Server Version: Current file content fetched from server. Used only with Tower source.

NB: File operations are performed using user credentials from server configuration. You should take care of filesystem access rights to ensure that file operations are performed without any issues.

File Templates

File templates are used to create and manage multiple files in bulk. Once a template is modified all related files are automatically updated.

To create a new file template go to Cetmix Tower/Files/Templates click Create and put values in the fields:

  • Name: Template name
  • File Name: Filesystem name of the file(s) created from this template. This field supports Variables.
  • Directory on server: Directory on remote server where this file will be stored. This field supports Variables.
  • Source: File source. Available options are Server and Tower. Check above for more details.
  • File type: Type of file contents. Possible options:
    • Text: Regular text. Eg configuration file or log
    • Binary: Binary file. Eg file archive or pdf document
  • Tags: Make usage as search more convenient
  • Note: Comments or user notes
  • Code: Raw file content. This field supports Variables.
  • Keep when deleted: If enabled, file(s) created from this template will be kept on remote server after removing it(them) in the Odoo

Hint: If you want to create a file from template but don’t want further template modifications to be applied to this file remove the value from the Template field before saving it.

Configure a Command

Command is a shell command that is executed on remote server. To create a new command go to Cetmix Tower/Commands/Commands click Create and put values in the fields:

  • Name: Command readable name.
  • Reference: Leave the “reference” field blank to generate a reference automatically.
  • Allow Parallel Run: If disabled only one copy of this command can be run on the same server at the same time. Otherwise the same command can be run in parallel.
  • Note: Comments or user notes.
  • Servers: List of servers this command can be run on. Leave this field blank to make the command available to all servers.
  • OSes: List of operating systems this command is available. Leave this field blank to make the command available for all OSes.
  • Tags: Make usage as search more convenient.
  • Action: Action executed by the command. Possible options:
    • SSH command: Execute a shell command using ssh connection on remote server.
    • Execute Python code: Execute a Python code on the Tower Server.
    • Create file using template: Create or update a file using selected file template and push / pull it to remote server / tower. If the file already exists on server it will be overwritten.
  • Default Path: Specify path where command will be executed. This field supports Variables. Important: ensure ssh user has access to the location even if executing command using sudo.
  • Code: Code to execute. Can be an SSH command or Python code based on selected action. This field supports Variables. Important! Variables used in command are rendered in different modes based on the command action.
  • File Template: File template that will be used to create or update file. Check File Templates for more details.

To return result from Python assign exit code and message to the COMMAND_RESULT variable of type dict like this:

# Success
COMMAND_RESULT = {
    "exit_code": 0,
    "message": "This will be logged as a result message because exit code == 0",
}

# Error
COMMAND_RESULT = {
    "exit_code": 21,
    "message": "This will be logged as an error message because exit code != 0",
}

Configure a Flight Plan

Flight Plans are used to execute commands in series. They allow to build a flexible condition based execution flow. To create a new flight plan go to Cetmix Tower/Commands/Flight Plans click Create and put values in the fields:

  • Name: Flight Plan name

  • Reference: Leave the “reference” field blank to generate a reference automatically.

  • On Error: Default action to execute when an error happens during the flight plan execution. Possible options:

    • Exit with command code. Will terminate the flight plan execution and return an exit code of the failed command.
    • Exit with custom code. Will terminate the flight plan execution and return the custom code configured in the field next to this one.
    • Run next command. Will continue flight plan execution.
  • Note: Comments or user notes.

  • Servers: List of servers this command can be run on. Leave this field blank to make the command available to all servers.

  • Tags: Make usage as search more convenient.

  • Code: List of commands to execute. Each of the commands has the following fields:

    • Sequence: Order this command is executed. Lower value = higher priority.
    • Condition: Python expression to be matched for the command to be executed. Leave this field blank for unconditional command execution. This field supports Variables. Example:
    {{ odoo_version }} == "17.0" and ( {{ nginx_installed }} or {{ traefik_installed }} )
    
    • Command: Command to be executed.
    • Path: Specify path where command will be executed. Overrides Default Path of the command. This field supports Variables.
    • Use Sudo: Use sudo if required to run this command.
    • Post Run Actions: List of conditional actions to be triggered after the command is executed. Each of the actions has the following fields:
      • Sequence: Order this actions is triggered. Lower value = higher priority.
      • Condition: Uses command exit code.
      • Action: Action to execute if condition is met. Also, if variables with values are specified, these variables will be updated (for existing variables on the server) or added (for new variables) to the server variables. Possible options:
        • Exit with command code. Will terminate the flight plan execution and return an exit code of the failed command.
        • Exit with custom code. Will terminate the flight plan execution and return the custom code configured in the field next to this one.
        • Run next command. Will continue flight plan execution.

Configure a Server Log

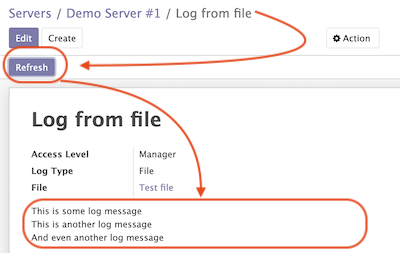
Server Logs allow to fetch and view logs of a server fast and convenient way. To configure a Server Log open the server form, navigate to the Server Logs tab and add a new record in the list.

Server logs tab

Following fields are available:

  • Name: Readable name of the log
  • Access Level: Minimum access level required to access this record. Please check the User Access Settings section for more details. Possible options:
    • User. User must have at least Cetmix Tower / User access group configured in the User Settings.
    • Manager. User must have at least Cetmix Tower / Manager access group configured in the User Settings.
    • Root. User must have Cetmix Tower / Root access group configured in the User Settings.
  • Log Type: Defines the way logs are fetched. Possible options:
    • Command. A command is run with its output being saved to the log
    • File. Log is fetched from a file
  • Command: A command that is used to fetched the logs. This option is available only for Log Type set to Command. Important: please ensure that selected command can be executed multiple times in parallel to avoid any potential issues.
  • Use Sudo: Use sudo if required to run this command.
  • File: A file that is used to fetch the log. This option is not available when configuring a log for a Server Template
  • File Template: A file template that is used to create a file when a new Server is created from a Server Template. This option is available only when configuring a log for a Server Template

Developer hint: log output supports HTML formatting. You can implement your custom log formatter by overriding the _format_log_text() function of the cx.tower.server.log model.

Configuration best practices

Use simple commands

Try to avoid using && or ; joined commands unless this is really needed. Use flight plans instead.

Why?

  • Simple commands are easier to reuse across multiple flight plans.
  • Commands run with sudo with password are be split and executed one by one anyway.

Not recommended:

apt-get update && apt-get upgrade -y && apt-get install doge-meme-generator

Way to go:

apt-get update
apt-get upgrade -y
apt-get install doge-meme-generator

Do not change directory using shell commands

Do not use cd or chdir commands. Use Default Path field in command or Path field in flight plan line.

Why?

  • Tower will automatically adjust the command to ensure it is properly executed in the specified location.

Do not do this:

cd /home/{{ tower.server.username }}/memes && cat my_doge_memes.txt

Way to go:

  • Add the following value in the Default Path command field or Path field of a flight plan line:
/home/{{ tower.server.username }}/memes
  • Leave the command code as follows:
cat my_doge_memes.txt

Usage

Create a new Server from a Server Template

  • Go to the Cetmix Tower/Servers/Templates menu and select a Server Template
  • Click “Create Server” button. A pop-up wizard will open with server parameters populated from the template
  • Put the new server name, check the parameters and click “Confirm” button
  • New server will be created
  • If a Flight Plan is defined in the server template it will be automatically executed after a new server is created

You can also create a new server from template from code using a designated create_server_from_template function of the cx.tower.server.template model. This function takes the following arguments:

- template_reference (Char): Server template reference
- server_name (Char): Name of the new server
- **kwargs:
  - partner (res.partner(), optional): Partner this server belongs to.
  - ipv4 (Char, optional): IP v4 address. Defaults to None.
  - ipv6 (Char, optional): IP v6 address. Must be provided in case IP v4 is not. Defaults to None.
  - ssh_password (Char, optional): SSH password. Defaults to None. Defaults to None.
  - ssh_private_key_value (Char, optional): SSH private key content.
  - ssh_private_key_value (cx.tower.key(), optional): SSH private key record. Defaults to None.
  - configuration_variables (Dict, optional): Custom configuration variable.
    Following format is used:
      'variable_reference': 'variable_value_char'
      eg:
      {'branch': 'prod', 'odoo_version': '16.0'}

Here is a short example of an Odoo automated action that creates a new server when a Sales Order is confirmed:

Automatic action

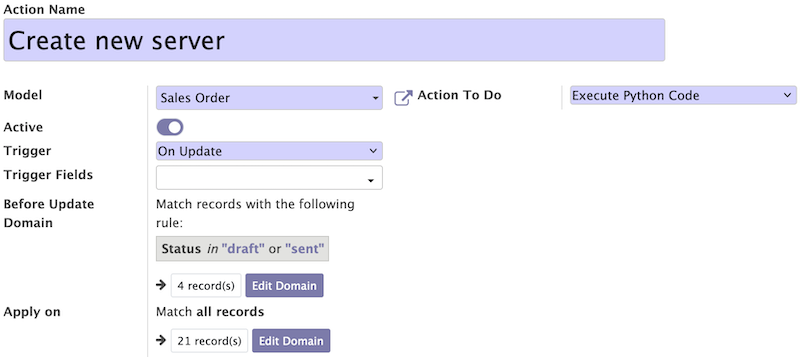
for record in records:

  # Check confirmed orders
  if record.state == "sale":
    params = {
      "ip_v4_address": "host.docker.internal",
      "ssh_port": 2222,
      "ssh_username": "pepe",
      "ssh_password": "frog",
      "ssh_auth_mode": "p",
      "configuration_variables": {
        "odoo_version": "16.0"
        },
    }

    # Create a new server from template with the 'demo_template' reference
    env["cetmix.tower"].create_server_from_template(
      template_reference="demo_template",
      server_name=record.name,
      **params
      )

Run a Command

  • Select a server in the list view or open a server form view
  • Open the Actions menu and click Execute Command
  • A wizard is opened with the following fields:
    • Servers: Servers on which this command will be executed
    • Tags: If selected only commands with these tags will be shown
    • Sudo: sudo option for running this command
    • Command: Command to execute
    • Show shared: By default only commands available for the selected server(s) are selectable. Activate this checkbox to select any command
    • Path: Directory where command will be executed. Important: this field does not support variables! Ensure that user has access to this location even if you run command using sudo.
    • Code: Raw command code
    • Preview: Command code rendered using server variables. IMPORTANT: If several servers are selected preview will be rendered for the first one. However during the command execution command code will be rendered for each server separately.

There are two action buttons available in the wizard:

  • Run. Executes a command using server “run” method and log command result into the “Command Log”.
  • Run in wizard. Executes a command directly in the wizard and show command log in a new wizard window.

You can check command execution logs in the Cetmix Tower/Commands/Command Logs menu. Important! If you want to delete a command you need to delete all its logs manually before doing that.

Run a Flight Plan

  • Select a server in the list view or open a server form view

  • Open the Actions menu and click Execute Flight Plan

  • A wizard is opened with the following fields:

    • Servers: Servers on which this command will be executed
    • Tags: If selected only commands with these tags will be shown
    • Plan: Flight plan to execute
    • Show shared: By default only flight plans available for the selected server(s) are selectable. Activate this checkbox to select any flight plan
    • Commands: Commands that will be executed in this flight plan. This field is read only

    Click the Run button to execute a flight plan.

    You can check the flight plan results in the Cetmix Tower/Commands/Flight Plan Logs menu. Important! If you want to delete a command you need to delete all its logs manually before doing that.

Check a Server Log

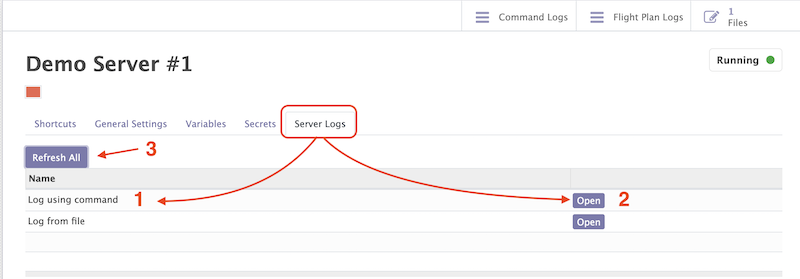
To check a server log:

  • Navigate to the Server Logs tab on the Server form
  • Click on the log (1) you would like to check to open in in a pop up window. Or click on the Open button (2) to open it in the full form view

Open server log

  • Click the Refresh button to update the log. You can also click the Refresh All button (3) located above the log list in order to refresh all logs at once. Log output will be displayed in the HTML field below.

Update server log

Using Cetmix Tower in Odoo automation

You can use various Cetmix Tower functions in Odoo automation. Such as server actions, automated actions or scheduled actions. While you can always call any public function directly most useful helper functions are located in a special abstract model “cetmix.tower”. You can check those functions in the source code in the following file: models/cetmix_tower.py

Bug Tracker

Bugs are tracked on GitHub Issues. In case of trouble, please check there if your issue has already been reported. If you spotted it first, help us to smash it by providing a detailed and welcomed feedback.

Do not contact contributors directly about support or help with technical issues.

Credits

Authors

  • Cetmix

Maintainers

This module is part of the cetmix/cetmix-tower project on GitHub.

You are welcome to contribute.