Odoo development quality highly depends on the tools used for it. Using Docker for Odoo development not only allows to simplify the development process but also makes it platform-independent.
Docker image has all the necessary dependencies installed. So you don’t have to care about them and fix compatibility issues for your operating system.
You can debug Odoo in Visual Studio code on MacOS using Apple Silicon M1 M2 power. Or debug Odoo on Ubuntu or Windows using almost the same configuration.
This tutorial is based on my own experience of using Apple MacBook Pro M1 for debugging Odoo using VSCode in Docker. You can use it “as is” or adapt it to your preferences.

[ Docker and Git ]
You need to have Docker and Git installed on your system. Use installation guides for your operating system to do that. NB: for installing Docker use the official Docker installation page.
If you are using Linux distribution it is recommended to add your user to “docker” group so you could run Docker commands without sudo. To do this run:
sudo usermod -a -G docker <your_username>

[ Directory structure ]
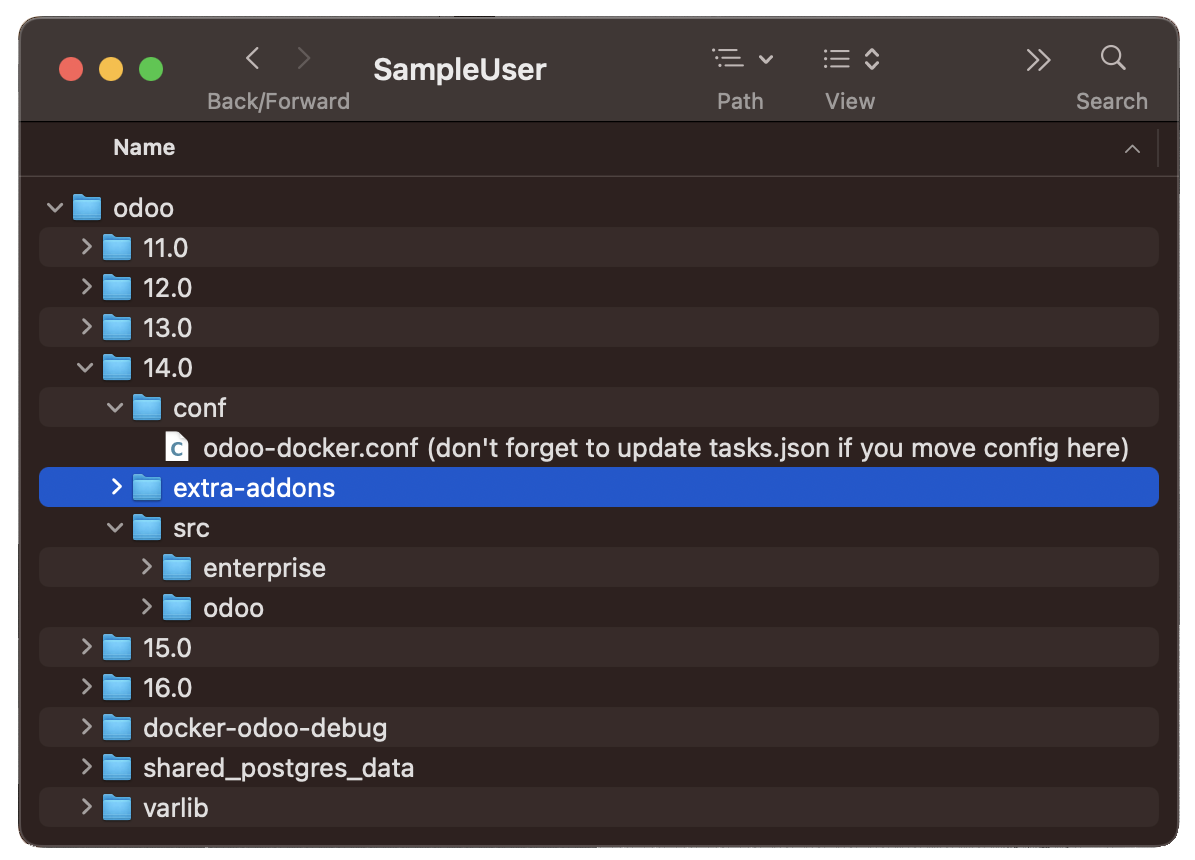
I use the following structure, but you can use any you like. Just don’t forget to update your configuration files accordingly.
The main idea behind my solution is to have the same directory structure both inside the container and on the host. This allows you to have just a single mount point and keeps configuration really simple.
$HOME/odoo
This is the root directory where all odoo-related stuff is kept.
$HOME/odoo/<odoo_version>
 Eg. [ $HOME/odoo/14.0 ]
These are version specific folders.
$HOME/odoo/<odoo_version>/src
$HOME/odoo/<odoo_version>/src/odoo
$HOME/odoo/<odoo_version>/src/enterprise (*optional)
Odoo source code. In my case it has two directories “odoo” and “enterprise” which are cloned git repositories of Community and Enterprise versions, Enterprise repo is not mandatory and is required only if you are developing for Odoo Enterprise.
$HOME/odoo/varlib
This directory is used for the Odoo filestore. It will be mounted as an external volume to Odoo container.
Important! You need to ensure that containerised Odoo has “write” access to this directory.
$HOME/odoo/shared_postgres_data
Postgres is also running in a container and its data is stored on external volume mounted to this directory.
DB server installation and configuration processes are described below.
$HOME/odoo/docker-odoo-debug
Cloned repo of this tutorial. It contains all necessary Odoo and VSCode configuration files.

[ Database server ]
A Postgres server is required to run Odoo. If you have one already, you can use it also for Odoo containers. However, I opted for having a separate Postgres container for Odoo development.
To preserve resources and improve performance I’m using a single Postgres container for all Odoo instances. Postgres data is stored in a mounted volume so it won’t be lost in case the container will be deleted.
Following command does the job:
mkdir -p $HOME/odoo/shared_postgres_data && \
docker run -d -e POSTGRES_USER=odoo -e POSTGRES_PASSWORD=odoo \
    -e POSTGRES_DB=postgres \
    -e PGDATA=/var/lib/postgresql/data \
    --shm-size=1g\
    --restart always \
    -v $HOME/odoo/shared_postgres_data:/var/lib/postgresql/data \
    -p 5432:5432 \
    --name db-shared postgres:14
Here are some comments regarding parameters:
shm-size=1g
This parameter is optional. It allocate 1GB of shared memory to Postgres. You can adjust this parameter based on your needs as well as amount of RAM available in your system . Or just omit it on development instances.
For production instances, you can use the following tool to configure your Postgres more precisely.
restart always
Tells Docker to start the container when Docker starts More details on that case are available here.
postgres:14
Tells Docker to download and run Postgres version 14: Odoo recommends using the latest stable version. However do not use too fresh PG versions because Odoo might not support them yet. You can check available Postgres images here.
-v $HOME/odoo/shared_postgres_data:/var/lib/postgresql/data
Mount the Postgres data directory from the container to $HOME/odoo/shared_postgres_data directory on the host system:
-p 5432:5432
Tells Docker to expose the Postgres port outside of the container so you can access your db directly on localhost:5432:
Important! When connecting to localhost from within another container (eg odoo container) we need to put host.docker.internal as destination host.
*Refer to the following link for more information about for to connect from within a Docker container to the host port.

[ Odoo source code ]
As mentioned above Odoo source code is stored in $HOME/odoo/<odoo_version>/src directory.
To clone Odoo source code run the following command [ as for Odoo 14 ] :
cd $HOME/odoo/14.0/src && git clone -b 14.0 --single-branch --depth=1 https://github.com/odoo/odoo.git
This command will clone only the 14.0 branch and only the latest commit so you can save disk space. To update the source code later just run:
cd $HOME/odoo/14.0/src/odoo && git pull

[VSCode ]
To work with Odoo using Docker the following extension should be installed in VSCode:
- Python
- Pylint
- Docker
[ Tutorial files ]
This tutorial comes with pre-configured Dockerfile and VSCode configuration files. By default, we assume that the tutorial repo is located in $HOME/odoo/docker-odoo-debug
Clone the tutorial repo using the following command:
cd $HOME/odoo && git clone https://github.com/cetmix/docker-odoo-debug.git
*Alternatively, you can download all files directly from repo.
In case you want to use some other location ensure that you have updated all the paths accordingly.
[ Odoo config file ]
Keep in mind that docker-odoo-debug directory also contains odoo.conf files. By default, they include paths only to the Odoo source code. To add your custom add-ons you need to modify odoo.conf and set add-ons paths.
[ Configuring VSCode ]
If you are starting your project from scratch you can simply copy and paste .vscode directory will all files from docker-odoo-debug directory into your project root directory.
If you already have configuration files in your project you will need to copy and paste some data from docker-odoo-debug/.vscode files into the same files in your project .vscode directory.
- From settings.json copy all variables starting with “odoo”. They are located below the “Cetmix Docker Debug Variables” comment.
- Copy all tasks from tasks.json
- Copy launch configuration from launch.json
settings.json contains project settings. Please put your project Odoo version into the odooVersion variable:

IMPORTANT! You also need to manually modify the version number in code paths for code autocomplete.
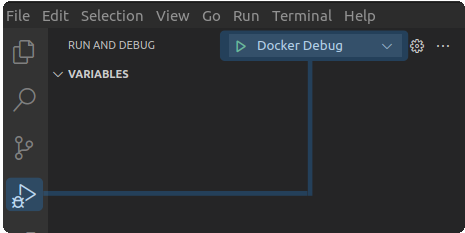
launch.json contains launch configurations which are run when you click the “Debug” button. You can add as many configurations as you need. For example, one configuration launches Odoo with --update=’my_module’ key which triggers automatic module update. And another one runs Odoo with a test suite.
tasks.json file contains tasks which are used by configurations described in the launch.json file.
Are you still here?
So, if you have followed all the steps correctly then your VSCode is ready to run your Odoo project in Docker.


[ Some optimization tweaks ]
In case you are working on multiple projects for the same Odoo version you might benefit from building an image before using it in IDE. It will skip the build step in the tasks.json and will make the debugging process faster.
To build your custom image use “docker build” command [ as for the version 14.0 ] :
docker build -t my-odoo:14.0 $HOME/odoo/docker-odoo-debug/14.0
After that disable the dependency on the docker-build task in tasks.json.
You need to //comment out the following string:
"dependsOn": ["build-image"],


[ Pre-flight checklist ]
I’ve prepared this checklist to make you ensure that everything is installed and configured properly.
- Git installed
- Docker installed from the official Docker page
- Odoo source code cloned from git
- Odoo filestore directory created and Odoo container user has write access
- VSCode plugins installed
- Python
- Pylint
- Docker
- Postgres DB server is up and running
- docker-odoo-debug cloned or downloaded from git
- docker-odoo-debug configuration files are copied into project .vscode directory or data from files is copied into existing project files
- odoo.conf filestore path points to correct filestore location
- odoo.conf odoo source code path points to correct filestore location
- odoo.conf custom add-ons path added if required
- settings.json “odooVersion” set to project Odoo version
- tasks.json paths to directories where these files are actually located.
- Odoo source code
- Dockerfile
- odoo.conf
- Want to use the same image for multiple projects?
- Docker image is built
- "dependsOn": ["build-image"], is disabled in tasks.json

Note for VSCode 1.75 as for 20 Feb 2022
VSCode version 1.75 has a bug which doesn't allow it to run Python in Docker.

Current working solution is to downgrade VSCode to version 1.74
To do this you need to uninstall VSCode and then download the previous version. After installing don’t forget to disable the IDE auto update. Check here how to do it.
And that’s all!
Hopefully you enjoyed that long read. Me and Cetmix crew wish you a pleasant flight in the world of Odoo!
Ivan Sokolov, CEO

Odoo development using Visual Studio Code and Docker